During a recent project, the challenge of providing reusable, interactive web components to allow content editors to build pages presented itself. These components were to be created and developed by different teams, and available on the main Drupal site and a set of static pages, each of which had specific requirements and were already working in production.
Several decisions factored into finding the right solution to this challenge. This article explains what those decisions were and how the solution was implemented.
The starting point for the widget registry project
This project required that the main Drupal site and a number of other static sites must be able to reuse the same pieces of content to build their pages. The Drupal site had a content architecture structured as pages containing a leadspace, or header, plus several other fragments, called bands, which could be created by content editors. Multiple visual layouts were available for the bands - an image and a paragraph, a headline with three cards linking to other pages, etc. These layouts are defined within Drupal as display modes and are used to render each band with a specific layout.
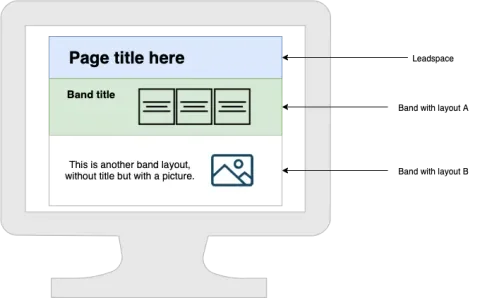
Example of page architecture based on a leadspace and several bands.
It was important to find a way to provide reusable interactive pieces of content to be rendered as bands on the Drupal site, and make them available “as is” to other sites as well. Enter the widgets.
In this context, a widget is a reusable, self-contained piece of software providing a specific feature for any website. From a technical perspective, a widget is a JavaScript library intended to render within the HTML of a page that presents custom functionality and is 100% reusable without relying on external dependencies.
After a thorough audit of the latest approaches to this problem, the decision was to implement an architecture inspired by the micro frontends technique.
Micro Frontends
Nowadays, one of the most popular ways to implement backend pieces is the microservices technique: a derivative of service-oriented architectures that defines any complex application as a collection of loosely coupled services**. A service is a self-contained component that provides specific functionality to the application and communicates with the rest of the application pieces through a well-defined API.
When the microservices architecture translates to front-end development, a web page can be composed using a set of already-built components that are ready to be rendered. The components are also self-contained, decoupled, and reusable in the same way several microservices build an application on the back end. This approach allows several teams to focus their efforts on a specific set of components, developed in parallel, and not be dependent on other teams. Additionally, components are independent of each other, which allows a content editor to build a page by just selecting components and putting them in the desired place.
Micro-frontends are owned by different teams, deployed independently, and available to editors to build pages.
There’s more information on micro frontends in this article.
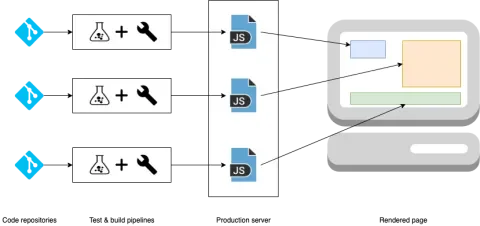
For this particular project, widgets were implemented as JavaScript libraries, following the micro-frontends approach. The widget source code, available as a single file, was loaded as usual by including a <script> tag. It provided an entry point, a function, to allow the widget to render inside a container from the HTML of the page (i.e., a <div> tag) once the DOM finished loading and said function executed.
Widget Basics
To transform this theoretical approach into a real live implementation, multiple options were considered for building a widget as a JavaScript single file application, like vanilla JavaScript, or one of the numerous JavaScript frameworks available today. After some research, the Create React App was chosen as a base to build our widgets for several reasons:
- React is a widely-used JavaScript framework, easy to use, and it has been around for some time so we can trust its reliability.
- There are plenty of tools that make React development easier and quicker while providing the same starting point for all teams developing a new widget.
- Create React App is compatible with Webpack, which we needed to efficiently pack widgets as a single JavaScript file with the ability to include assets, like fonts or image files.
- It makes it trivial to have a local environment for the widget: running npm-start is all that’s required to have a local server where the widget is loaded.
There are some downsides when using React, though. If every widget is a full React application, the number of bytes the browser needs to download to render it is higher than if using other tools. This is because every widget includes a number of dependencies.
Due to how the project works and how editors were used to building their content, loading multiple widgets onto the same page was taken into account. As a result, some of the widget dependencies would likely duplicate. For example, lodash, a very common package when building React apps, may be loaded by more than one widget on the same page. Avoiding this duplication was not easy because it required loading multiple script tags on the browser, one per shared dependency, plus the widget source JS file. The expectation was to place only one or two widgets at most on any given page, so the risk of duplication was worth taking.
Rendering a Widget within a Page
Since the widgets are React applications compiled as an independent, single JavaScript file, it was important to have some control over the loading process so the widgets could render in a specific position on the page once the DOM was ready. To achieve this, the widget file was required to define an entry point function on the window object, as described in this section from the aforementioned micro-frontends article. The function received the DOM element ID of the container tag where the widget should render. It looked something like the following:
import ReactDOM from 'react-dom';

/**
 * Renders the widget.
 *
 * @param {string} instanceId
 *   The HTML element ID where the React app will be rendered.
 * @param {Function} cb
 *   An optional callback executed after the widget has been rendered.
 */
function render(instanceId, cb) {
  const element = document.getElementById(instanceId);
  if (element) {
    ReactDOM.render(
      <YourReactAppHere>,
      element,
      () => cb(element)
    );
  }
}

window.renderExampleWidget = render;
To simply identify the entry point function, the naming convention was to use the word render plus the machine name of the widget in CamelCase. For example, if the widget’s machine name (and its repository) was example-widget, the render function would be named renderExampleWidget. The widget’s machine name was an arbitrary attribute defined by the team working on the widget, but it becomes more relevant later.
Finally, all widgets needed to implement a consistent compile process with two steps:
npm install
PUBLIC_URL='<some url>' npm run build
The first step installed all dependencies, and the second one generated a directory named build which contained the production-ready release of the widget, with the following structure:
build
 ├── js
 │   └── main.js
 └── media
     ├── some-picture.png
     └── some-font.ttf
The main.js library had the responsibility of loading any asset from the build/media directory. Using relative URLs prepended by an environment variable named PUBLIC_URL was required to access these files from the main.js library which looked something like this:
<img src="`${PUBLIC_URL}/media/picture.png`" />
This way, the PUBLIC_URL variable could remain empty for local development, and the assets were loaded. Once uploaded to the registry, the production build of the widget knew where it could locate the assets on the registry. The Create React App documentation contains more information about the PUBLIC_URL parameter.
The lack of a styles file on the build directory structure described above was probably noticeable. The reason is that CSS is global, and there is no way to encapsulate a style rule to be applied on a specific section of a page only. This means that allowing the React application to load a CSS file can potentially break styles on page sections outside of the widget scope. The decision made to prevent this situation was to leave these files out and allow only CSS-in-JS tools to handle widget styles.
The Widget Registry
The widget registry is a centralized place where production builds of widgets can render into any preferred website. The main goals of the registry were to maintain a list of published widgets as a web service, so it could be programmatically read by sites, and provide a server in which the widgets could be directly injected. The sites loading widgets would not need to download widget files or keep them up to date.
The registry itself is a set of moving pieces that enable automation of the management of widgets, and it is formed by the following tools:
- A Github repository where the registry code lives. The most relevant piece on the repository is a JSON file containing a listing of available widgets as an array of objects, each one of the objects representing a different widget. These objects contain information like human and machine names, the git repository where the widget code lives, and the latest version published on the registry.
  {
    "repositoryUrl": "https://github.com/Lullabot/example-widget",
    "machineName": "example-widget",
    "title": "Example Widget",
    "version": "v1.0.0",
  }
- Some scripts to verify that the format of the JSON file matches a definition that was implemented using JSON Schema, which is run on every commit to ensure the registry JSON file is never malformed. There are also a couple of other scripts that compile all registered widgets and upload the production builds to the widget server.
- A CI tool, properly integrated with the repository. In this case, Travis took the responsibility of running the scripts mentioned above when a new pull request was created against the main branch. Once everything looked good, and the code merged into the main branch, the CI tool iterated over the list of registered widgets and downloaded a GitHub release from each widget’s repository whose name matched the value of the version field on the JSON object. At this point, the tool attempted to compile the widget and, when everything finished successfully, all compiled widgets were ready to be uploaded to a public server.
- A public server where the widget’s production builds are available, along with the registry JSON file. For this project, IBM Cloud Object Storage was used, but any asset server or cloud provider can do the trick.
Loading a Widget from the Registry
Once the deployment process was complete, and the registry JSON file and the production builds for all registered widgets were available on the server, it was time to render a widget directly from the registry.
The first step to inject a widget was to create a container within the HTML where the widget was rendered. In this example, a <div> tag was used with a unique value for the id attribute:
<div id="widget-comes-here"></div>
Next, the widget JavaScript application needed to be included in the HTML of the page. The library can be included in the <head> or <body> tags if preferred.
<script src="//<widget registry domain>/<widget-machine-name>/js/main.js"></script>
Finally, the widget’s entry point function was called once the DOM is ready. Something like the following can be done (assuming the entry point function set by the widget library is named renderWidget, but it could be any other name):
document.addEventListener("DOMContentLoaded", function() {
  window.renderExampleWidget('widget-comes-here');
});
Putting everything together, this is how a simple HTML page looked when rendering a widget:
<html>
  <head>
    <script src="//<widget registry domain>/<widget-machine-name>/js/main.js"></script>
    <script>
      document.addEventListener("DOMContentLoaded", function() {
        window.renderExampleWidget('widget-comes-here');
      });
    </script>
  </head>
  <body>
    <div id="widget-comes-here"></div>
  </body>
</html>
Drupal Integration
Once the widget registry was up and running and some of the widgets were registered, the micro-frontends needed to be integrated in order to work properly with Drupal. To achieve this, a custom module was created that includes the following features:
- A custom entity type to represent the widgets definitions available on the registry JSON file, named Widget Type. This way, the site was able to identify which widgets were ready to be used, and which versions were the latest published for each one of them.
- A cron job to update local Widget Type entities with the latest information available from the registry JSON file.
- A Drupal JavaScript behavior that took care of rendering all widgets on a page.
- Some configuration to locate the URL of the registry, among others.
Widgets could be referenced from an entity reference field that was added to the band entity, only visible when a specific layout for the band is selected. This field allowed for creating a new widget instance from a specific widget type. Once the page was saved, Drupal rendered the band, attaching the widget’s JavaScript file as an external library with the behavior mentioned earlier. Then, the behavior executed the entry-point function for all widgets present on the page, and each one of them rendered within its parent band.
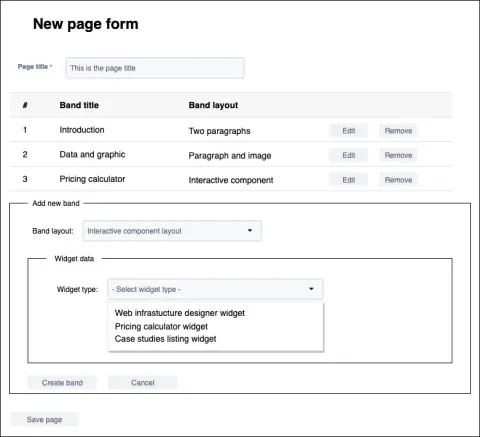
How a widget is referenced from a band within a page form.
It’s worth mentioning that the decision was made to load the widget source files directly from the registry rather than downloading them to do the following:
- Prevent the need to maintain the files locally
- Improve performance, as the site does not need to serve those files
- Serve a widget’s latest build immediately when a new version hits the registry. This is achieved because the new code is served under the same URL unless there is a major version change. Because of this logic, there is no need to clear caches on the Drupal site to have it render the new version, as the client browser realizes the file's Etag header is changed and downloads the new widget library if needed.
Something to note about this last point is that there isn’t any CDN in front of the widget registry at the moment of writing this article. If one is put in place in the future, there would probably be some time until the new widget version is present on the CDN after deployment, so the new code will not render immediately. But, for now, it does!
In summary
The described architecture is a simplification of the widget system built for the project, but the article illustrates how the micro-frontends approach was implemented to allow the content editors of a Drupal site to reuse components on multiple pages and sites, how a centralized service was created to allow these components to be available to both Drupal and non-Drupal sites, and how they were integrated into Drupal specifically.
There are some additional topics to discuss, such as passing field values from Drupal to a widget, multi-language support based on Drupal’s current language, allowing external CSS styles which do not interfere with the rest of the page or a CLI tool to manage the registry JSON file, and those may be the basis for future articles.