I recently rebuilt my home network with a new router. As we all work from home, we use Slack, Hangouts, and other VoIP services all the time. It’s really important that voice and video calls are reliable and glitch-free. As I was researching the right configuration for my router, I noticed that there were lots of really nice graphs in various blog posts.
It turned out that they were all being generated by Flent, the “Flexible Network Tester.” With Flent, you can easily see how your internet connection behaves under load. When we think of testing a home internet connection, we usually just use a speed test like those from speedtest.net that measures download and upload speeds. While these are great for initial testing, they don’t accurately represent what really matters for most people: latency, how long it takes to send a small bit of data and get a response back. If you’ve ever had to drop a Skype or Hangouts call because of glitches, odds are you’re running into latency spikes, and not low bandwidth. Using Flent requires a bit of setup locally, and a remote server to test against. Here’s how I got Flent up and running on my Mac laptop, testing against an Ubuntu server hosted at Linode.
Netperf and fping setup
Flent is a wrapper around other, lower-level network testing tools. On the server side, it requires the netserver daemon to be running, which is included in Netperf. When I was first testing, I was using an Ubuntu 12.04 server where Netperf was quite out of date and didn’t meet the minimum version required by Flent. Since then, I’ve upgraded to Ubuntu 16.04, and in basic testing Flent works as expected. However, the package runs the daemon by default as root, and is still one point release out of date. Here’s how I compiled the latest version and ran it as a regular user. Note that there is also a public test server at netperf.bufferbloat.net, though I haven’t used it myself.
When compiling software, I like to check out code from source control instead of using tarballs, as it makes it easy to track any changes or new files. Netperf is using Subversion, so I installed that along with the basic compiler tools:
$ sudo apt install build-essential subversion
$ svn checkout http://www.netperf.org/svn/netperf2/tags/netperf-2.7.0
$ cd netperf-2.7.0
$ ./configure && make
$ src/netserver -D # Run netserver without actually installing it
On the client, both Netperf and a compatible ping tool are required. On macOS, Netperf is available in Homebrew, which makes it almost easy to install. Unfortunately, Flent requires that Netperf is compiled with “demo mode” enabled, so we have to edit the formula for it. This gist got me pointed in the right direction. It turns out that Flent’s 2.7.0 demo mode has been broken on macOS for some time. Run brew edit netperf, and add support for HEAD and the --enable-demo flag:
diff --git a/Formula/netperf.rb b/Formula/netperf.rb
index 3ba24764a..daaa27e2a 100644
--- a/Formula/netperf.rb
+++ b/Formula/netperf.rb
@@ -3,6 +3,7 @@ class Netperf < Formula
   homepage "http://netperf.org"
   url "ftp://ftp.netperf.org/netperf/netperf-2.7.0.tar.bz2"
   sha256 "842af17655835c8be7203808c3393e6cb327a8067f3ed1f1053eb78b4e40375a"
+  head "http://www.netperf.org/svn/netperf2/trunk", :using => :svn

   bottle do
     cellar :any_skip_relocation
@@ -15,7 +16,8 @@ class Netperf < Formula

   def install
     system "./configure", "--disable-dependency-tracking",
-                          "--prefix=#{prefix}"
+                          "--prefix=#{prefix}",
+                          "--enable-demo"
     system "make", "install"
   end
Finally, install with brew install --HEAD netperf.
As I was using macOS, I needed to install fping with brew install fping.
Flent itself is written in Python, and is available in pip. Since we’re already using Homebrew, we may as well avoid the macOS python and it’s sudo requirements by installing python with brew install python. Now, we can install Flent with pip install flent. Verify it’s working by running flent --help.
Running Tests
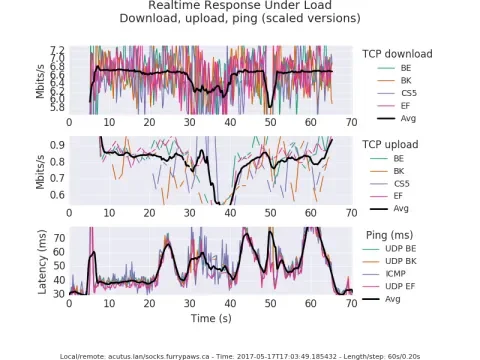
Lets run some tests and generate graphs! The most common test is the ‘realtime response under load’, or ‘rrul’ test. This test runs 4 downloads, 4 uploads, and pings at the same time.
$ flent rrul -p all_scaled -l 60 -H myserver.example.com -o graph.png && open graph.png
On my network with the Flow Queuing CoDel traffic shaper enabled, we can see I’m getting around 27Mbit/s (6.7 MBit/s times 4 download streams), and around 3.4Mbit/s upload, with latency no worse than 80ms. In this case, my network was in no way “quiet,” with several other applications and computers using bandwidth at the same time. If I had truly limited bandwidth to Flent, the graphs would have much less deviation.
To see all of the available tests, look at the configuration files in /usr/local/lib/python2.7/site-packages/flent/tests. They are well documented and offer some really interesting scenarios for this sort of performance testing.
Flent has been an invaluable tool in testing my home network. While it’s great for running active tests, it isn’t a replacement for network monitoring. Next, I hope to build a dashboard to capture historical bandwidth and latency on my network connection.

