This article is a follow-up for Debugging PHP email with MailHog. It shows an alternative way to set up MailHog, a debugging SMTP server, in a way that does not involve Docker.
MailHog is a neat tool that catches outgoing email and presents it via a web interface and an API. In this article we show the steps to install and configure it for Ubuntu.
Thanks to Jonathan Bossenger for testing this approach in multiple Ubuntu versions. At the time of this last update, this approach works for Ubuntu 16.04, 18.04, 19.04, and 22.04 LTS.
Install the Go programming language
MailHog is written in Go. You can check if Go is installed by executing go in a terminal. If it is not, then install it with this command:
[juampy@carboncete ~]$ sudo apt-get install golang-go
[juampy@carboncete ~]$ mkdir gocode
[juampy@carboncete ~]$ echo "export GOPATH=$HOME/gocode" >> ~/.profile
[juampy@carboncete ~]$ source ~/.profile
Download and configure MailHog
Now that we have the Go language installed, let’s download MailHog (the SMTP server) plus mhsendmail, which is the mail handler that forwards PHP’s outgoing email to MailHog:
[juampy@carboncete ~]$ go get github.com/mailhog/MailHog
[juampy@carboncete ~]$ go get github.com/mailhog/mhsendmail
When we installed Go, we added a line to our profile to set the $GOPATH variable. This is the path where packages are installed. Let’s copy the above binaries to a location where they are available everywhere in the system:
[juampy@carboncete ~]$ sudo cp /home/juampy/gocode/bin/MailHog /usr/local/bin/mailhog
[juampy@carboncete ~]$ sudo cp /home/juampy/gocode/bin/mhsendmail /usr/local/bin/mhsendmail
Finally, let’s connect PHP with MailHog at php.ini. Find the sendmail_path setting and set it in the following way:
sendmail_path = /usr/local/bin/mhsendmail
That’s it for the configuration. In the next section we will test MailHog manually.
Starting MailHog manually
Starting MailHog is a matter of running the executable with a few extra options:
[juampy@carboncete ~]$ mailhog \
  -api-bind-addr 127.0.0.1:8025 \
  -ui-bind-addr 127.0.0.1:8025 \
  -smtp-bind-addr 127.0.0.1:1025

2018/02/07 19:38:32 Using in-memory storage
2018/02/07 19:38:32 [SMTP] Binding to address: 127.0.0.1:1025
[HTTP] Binding to address: 127.0.0.1:8025
2018/02/07 19:38:32 Serving under http://127.0.0.1:8025/
Creating API v1 with WebPath:
Creating API v2 with WebPath:
Check out the above output: MailHog’s web interface is running at http://127.0.0.1:8025. Let’s open it in a browser:
Got it! MailHog is running. In the next section we will verify that it traps outgoing email and presents it in the web interface.
Note: MailHog listens by default on 0.0.0.0, which means all available network interfaces. This is the reason why we specify the loopback IP address when running the command as otherwise anyone connected to the same network than us could access to MailHog’s resources.
Testing email submission
The following command line script will send a dummy email using your existing PHP configuration:
[juampy@carboncete ~]$ php -r "\$from = \$to = 'your.emailaddress@gmail.com'; \$x = mail(\$to, 'subject'.time(), 'Hello World', 'From: '. \$from); var_dump(\$x);"

Command line code:1:
bool(true)
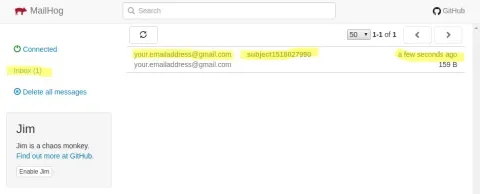
Now let’s once again open MailHog’s web interface to verify that the email is there:
It worked! See, the web interface looks like an actual email client. There is also an API available which is useful if you want to run tests that check that email has been submitted. For example, the following request returns the list of email messages as a JSON string:
[juampy@carboncete ~]$ curl http://127.0.0.1:8025/api/v2/messages
{
  "total": 1,
  "count": 1,
  "start": 0,
  "items": [
    {
      "ID": "bf8onQKNcOI3iE9qrEeCAS_xAX88RJqkfSWIfEy5s7U=@mailhog.example",
      "From": {
        "Relays": null,
        "Mailbox": "juampy",
        "Domain": "carboncete",
        "Params": ""
      },
      "To": [
        {
          "Relays": null,
          "Mailbox": "your.emailaddress",
          "Domain": "gmail.com",
          "Params": ""
        }
      ],
Start MailHog when the system boots
So we are all set but, what about tomorrow when I start my computer? Now that I know how MailHog works, I would like to keep it running all the time so I don’t need to worry about outgoing email while developing.
Linux supports systemd, a service manager. After some research, I found out that it is a common method to manage services. Let’s create a service file for MailHog and then register it.
- Create the file
/etc/systemd/system/mailhog.serviceand paste the following into it:
[Unit]
Description=MailHog service

[Service]
ExecStart=/usr/local/bin/mailhog \
  -api-bind-addr 127.0.0.1:8025 \
  -ui-bind-addr 127.0.0.1:8025 \
  -smtp-bind-addr 127.0.0.1:1025

[Install]
WantedBy=multi-user.target
- Start the service to verify that it works:
sudo systemctl start mailhog. - Enable the service so it runs on bootup:
sudo systemctl enable mailhog. - Restart your system and then verify that the MailHog service is running.
[juampy@carboncete ~]$ systemctl | grep mailhog mailhog.service loaded active running MailHog service - Next, open the MailHog web interface at 127.0.0.1:8025.
- Finally run again the above PHP script to send a dummy email and verify that it comes up at the web interface.
You are done! From now on you won’t have to worry about outgoing email being sent from your local development environment. Plus, if you ever need to test outgoing email, you can now browse it at MailHog’s web interface or test it via making a request to its API.
Resources
Here are a few resources that I used to write this article:


