These days I am helping Iowa State University with one of their websites. There is a standard subscription system that notifies editors when someone makes changes to content. We are migrating the site to a newer infrastructure so in order to verify that the subscription system works as expected I wanted to run a few tests.
Normally, I'd shortcircuit outgoing email from getting sent from my personal computer via one of the methods outlined at Oh no! My laptop just sent notifications to 10,000 users. This time, however, I wanted to analyze email going through so I searched for ways to redirect outgoing email to a log. I found custom scripts but not a tried and true best practice. It was via the Docker4Drupal project (a Docker-based foundation for Drupal projects) that I discovered MailHog, a debugging SMTP server. I saw that it had a considerable amount of activity on GitHub so I decided to try it.
While MailHog’s developer experience is awesome, it took me a while to figure out how to install and configure it. Hence I am sharing my personal experience in this article in hopes that it can serve as a time saver.
Installing MailHog
There are several ways to install MailHog: downloading it from GitHub, through a Go package, using Homebrew, or using Docker. The easiest and most cross-platform one that I found is by using the Docker image plus mhsendmail. If you prefer to install MailHog manually and keep it running as a Systemd service, then check out the companion article Installing MailHog for Ubuntu 16.04.
Running MailHog in the background with Docker
Let’s download the Docker image and run a container as a daemon, so it starts automatically the next time we boot the system. See, it’s just one command:
[juampy@carboncete ~]$ docker run --detach \
   --name=mailhog \
   --publish=127.0.0.1:8025:8025 \
   --publish=127.0.0.1:1025:1025 \
   --restart=unless-stopped \
   mailhog/mailhog
The above command will:
- Run a Docker container in the background via
--detach. - Set a label to the container via
--name=mailhog. - Expose MailHog’s web interface and API locally via
--publish=127.0.0.1:8025:8025. - Expose MailHog’s SMTP interface locally via
--publish=127.0.0.1:1025:1025. - Start automatically via
--restart=unless-stopped.
The above command will print the container identifier and then exit because we requested Docker to run the container in the background. Now let’s look at its log to verify that it started correctly:
[juampy@carboncete ~]$ docker logs mailhog
2018/02/06 21:20:08 Using in-memory storage
2018/02/06 21:20:08 [SMTP] Binding to address: 0.0.0.0:1025
2018/02/06 21:20:08 Serving under http://0.0.0.0:8025/
[HTTP] Binding to address: 0.0.0.0:8025
Creating API v1 with WebPath:
Creating API v2 with WebPath:
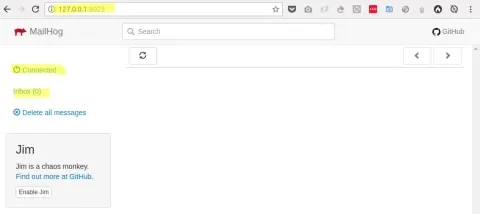
Check out the above output: MailHog’s web interface is running at 0.0.0.0:8025. MailHog by default listens on 0.0.0.0, which means whatever internal IP address is assigned to the Docker container. The --publish flag maps the container's internal IP address to 127.0.0.1 on the host machine. Not setting the loopback IP address to the container would mean that anyone connected to the same network could access MailHog’s resources. Let’s open it in the web browser:
Got it! MailHog is running. In the next section, we will install mhsendmail, so PHP sends outgoing email to MailHog.
Connecting PHP’s email with MailHog through mhsendmail
To send outgoing email from PHP to MailHog, we need to download mhsendmail and then reference it at php.ini. Start by opening the mhsendmail’s releases page and download the one for your system. Then make it available in your system path. For example, I use Ubuntu 16.04, so I used these commands:
[juampy@carboncete ~]$ wget https://github.com/mailhog/mhsendmail/releases/download/v0.2.0/mhsendmail_linux_amd64
[juampy@carboncete ~]$ sudo chmod +x mhsendmail_linux_amd64
[juampy@carboncete ~]$ sudo mv mhsendmail_linux_amd64 /usr/local/bin/mhsendmail
Next, let’s connect PHP to MailHog at both web server and CLI’s php.ini files. Find the sendmail_path setting. If you have never modified it, it will look like this:
; sendmail_path =
Remove the semi-colon and set its value to mhsendmail:
sendmail_path = /usr/local/bin/mhsendmail
Restart the web server. We are now ready to test sending an email and seeing if MailHog shows it in the web interface.
Testing email submission
The following command line script will send a dummy email using the current PHP configuration:
[juampy@carboncete ~]$ php -r "\$from = \$to = 'your.emailaddress@gmail.com'; \$x = mail(\$to, 'subject'.time(), 'Hello World', 'From: '. \$from); var_dump(\$x);"

Command line code:1:
bool(true)
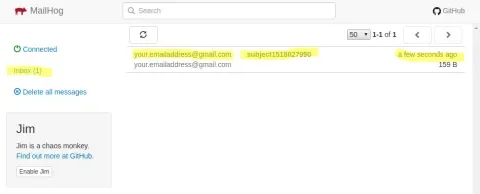
Now let’s open again MailHog’s web interface to verify that the email is there:
It worked. See, the web interface looks like an actual email client. Now let’s wrap up by testing MailHog’s API.
Retrieving messages via MailHog’s API
MailHog offers an API which is useful if you want to run tests that check that email has been submitted. For example, the following request returns the list of email messages as a JSON string:
[juampy@carboncete ~]$ curl http://127.0.0.1:8025/api/v2/messages
{
  "total": 1,
  "count": 1,
  "start": 0,
  "items": [
    {
      "ID": "bf8onQKNcOI3iE9qrEeCAS_xAX88RJqkfSWIfEy5s7U=@mailhog.example",
      "From": {
        "Relays": null,
        "Mailbox": "juampy",
        "Domain": "carboncete",
        "Params": ""
      },
      "To": [
        {
          "Relays": null,
          "Mailbox": "your.emailaddress",
          "Domain": "gmail.com",
          "Params": ""
        }
      ],
You are all set! From now on, you have a web interface and an API to browse and test outgoing email, plus you won't have to worry about unintentionally sending email to your website’s users while developing locally. If you need further alternatives to block outgoing email, then check out Andrew Berry’s article Oh no! My laptop just sent notifications to 10,000 users.
Acknowledgements
- Andrew Berry, for his technical and editorial feedback.
- Ben Chavet, for his technical feedback.
- Rubén Eguiguren, for encouraging me to try the Docker installation.
Here are some of the resources that I used to write this article:


