This is the third part in a series of articles about Elasticsearch. We started by setting up the foundation with Indexing content from Drupal 8 using Elasticsearch. Next, we saw a purely client-side solution in An HTML and JavaScript Client for Elasticsearch. This article wraps up the series offering a server-side solution written in Node.js.
The demo consists of an Express application that uses the official Elasticsearch library to send requests to and process responses from an Elasticsearch index. I have also packaged the demo with Docker so you can try it in your machine.
Quick! Try it out
If you use Docker, the demo repository that we will use in this article contains instructions on how to spin up the environment. It consists of a Node.js application and an Elasticsearch server. Additionally, there is a script that creates the index in Elasticsearch and pushes data for the demo.
Here is a clip that shows how I boot up the demo and then play with it:
How it works
Let’s see in the following sections how each of the pieces fit together.
The form
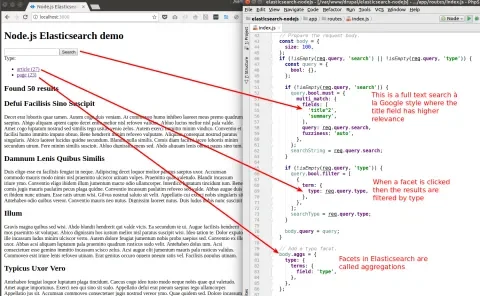
The following image has the form on the left side and the related source code on the right side. There are a few annotations on how each piece of the form is then used to build a query that is then submitted to Elasticsearch:
Making requests and processing responses to Elasticsearch
The heart of the application is in the function below. It is used both when we visit the application with the browser, and when we perform a search. It does the following:
- Initiates the Elasticsearch client.
- Builds the query (skipped as it was explained in the screenshot above).
- Performs the request to Elasticsearch.
- Hands out the response data to a template or logs an error.
https://github.com/juampynr/elasticsearch-nodejs/blob/master/app/routes/index.js#L24
const doSearch = function doSearch(req, res) {
  // Initialize the Elasticsearch client.
  const client = new elasticsearch.Client({
    host: 'http://elastic:changeme@elasticsearch:9200',
    log: 'trace',
  });

  // Prepare the request body.
  // Skipped for this snippet.

  // Perform the search request.
  client.search({
    index: 'elasticsearch_index_demo_elastic',
    body,
  }).then((resp) => {
    // Render results in a template.
    res.render('index', {
      hits: resp.hits.hits,
      total: resp.hits.total,
      aggregations: resp.aggregations.type.buckets,
      searchString,
      searchType,
    });
  }, (err) => {
    console.trace(err.message);
  });
};
Thanks to the above function, the two routes below can process GET and POST requests in the same way:
https://github.com/juampynr/elasticsearch-nodejs/blob/master/app/routes/index.js#L106
/**
 * The initial request that loads the form and all the documents in
 * Elasticsearch.
 *
 * @param {Object} req
 *   The request object.
 * @param {Object} res
 *   The response object.
 */
router.get('/', (req, res) => {
  doSearch(req, res);
});

/**
 * Processes form submissions by modifying the query for Elasticsearch.
 *
 * @param {Object} req
 *   The request object.
 * @param {Object} res
 *   The response object.
 */
router.post('/', (req, res) => {
  doSearch(req, res);
});
Rendering results
After getting a successful response from Elasticsearch, the doSearch function hands the rendering of the data to a Pug template. I have added a few inline comments in order to make it easier to understand each of the sections.
https://github.com/juampynr/elasticsearch-nodejs/blob/master/app/views/index.jade
div(id="search_container")
    form(id='search_form' method='GET' action='/')
        //- The search form.
        div(id="search_box")
            input(type="text" id="search" name="search" value="#{searchString}")
            input(type="hidden" id="type" name="type" value="#{searchType}")
            input(type="submit" value="Search")
        //- Iterate the list of facets. Render the title and the total results.
        div(id="facets")
            span Type:
            ul
                //- This is a for loop using Pug's syntax.
                each aggregation in aggregations
                    li
                        a(href="" class="facet" data-value="#{aggregation.key}") #{aggregation.key} (#{aggregation.doc_count})

//- Render the total amount of results found by Elasticsearch.
div(id="total")
    h2= 'Found ' + total + ' results'

//- Loop results and render the title and summary of each of them.
div(id="hits")
    each hit in hits
        h2= hit._source.title
        div!= hit._source.summary[0]
Facets
Facets are links that aggregate search results by a property and, when clicked, filter the results further. In order to replicate this behavior, I wrote the following vanilla JavaScript that adds an event listener which, when clicking on a facet, toggles filtering and submits the form. Check out the demo video at the top of the article to see it in action.
https://github.com/juampynr/elasticsearch-nodejs/blob/master/app/public/javascripts/facets.js
/**
 * Adds behaviors to toggle facets.
 */
const Anchors = document.getElementsByClassName('facet');

// Loop facets and add a click listener.
for (let i = 0; i < Anchors.length; i += 1) {
  Anchors[i].addEventListener(
    'click',
    function addListeners(event) {
      event.preventDefault();
      const value = this.getAttribute('data-value');
      // Either set a hidden field with the facet value or set it to an empty string.
      const oldValue = document.getElementById('type').getAttribute('value');
      if ((oldValue.length === undefined) || (oldValue === '')) {
        document.getElementById('type').setAttribute('value', value);
      } else {
        document.getElementById('type').setAttribute('value', '');
      }
      // Finally, submit the form.
      document.getElementById('search_form').submit();
    },
    false,
  );
}
Take it and use it
If you found this example useful, feel free to take any ideas from it and apply them to your project. It took me a while to figure out how to configure Elasticsearch, how to add security to it, and how to consume it’s content.
I hope that this series of articles have given you a few tips to speed up your work. If you missed the previous ones, have a look at Indexing content from Drupal 8 using Elasticsearch and then An HTML and JavaScript Client for Elasticsearch. Have fun!

