After updating to Adobe CC 2015, there were some small changes that drove me completely nuts, especially in Photoshop and Illustrator. I spent an ungodly amount of time combing through preferences and tool settings (I even watched a video to relearn how to use the crop tool in Photoshop), and I think I finally have Photoshop and Illustrator set to the point where I can actually use them without pulling out my hair. In this article I provide some tips that hopefully spare you some frustration when using Photoshop or Illustrator CC 2015 for the first time.
Disabling the animated zoom functionality in Illustrator
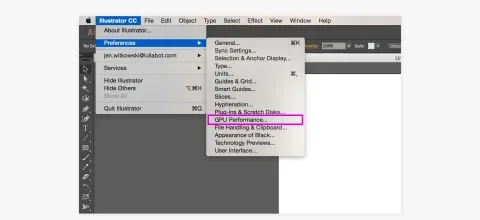
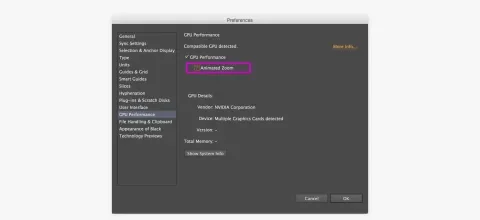
Adobe’s new animated zoom feature is turned on by default in the new version of Adobe CC 2015. Luckily, they provide a way to turn this off. If you’re like me and find the animated zoom annoying, choppy, or worse; slowing down your computer, then I would recommend disabling animated zoom. You can find it in Preferences under GPU Performance.
Disabling the GPU performance in Illustrator
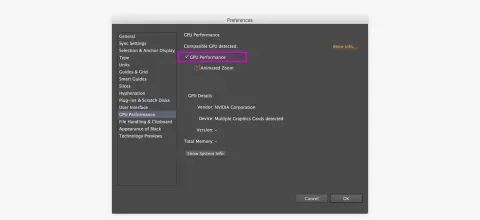
If you’re experiencing issues with graphics and typography displaying in Illustrator, it could be related to the GPU performance. When you launch Illustrator for the first time, Illustrator will recommend that you turn this on if you have a compatible graphics card. Not knowing what it was at the time or what it did, I chose to follow Adobe’s recommendation and turned this on. After all, Adobe told me that I did have a compatible graphics card. This is what I saw when I opened my first file after the update.
The above is not what I expected to happen. After restarting Illustrator a couple of times and then restarting my computer without success, I realized that it may be a preference setting in Illustrator that’s gone rogue. I stumbled across the GPU Performance option and immediately realized that this was probably the culprit. I unchecked it and viola, issue solved.
One thing to note is that when you disable the GPU performance, you also disable the animated zoom. Yes! I love killing two birds with one stone. My issue was pretty severe, but there are other smaller graphics problems that can appear due to GPU performance including random lines appearing and disappearing when scrolling down a page or while using the hand tool to “swim” through designs. My suggestion is that if you’re experiencing any weird graphic anomalies, try turning off the GPU performance to see if the problem is resolved. You can find the option under Preferences.
Enabling the resizing handles when clicking on an object in Illustrator
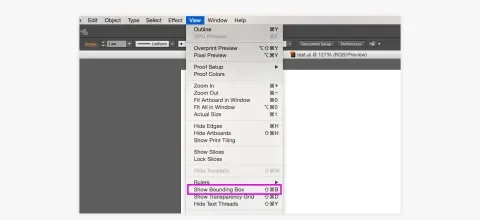
By default, Illustrator disables the resizing handles that appear when you click on an object on the artboard. I’d love to be able to understand the data behind this decision, because most designers I know use the bounding box handles to resize objects more than the actual transform tool. Good thing you can re-enable these fairly quickly with a shortcut or a menu item. Just press command+shift+B to toggle the shortcut for the bounding box, or you can find the Show Bounding Box option under the menu item View.
Enabling classic crop setting when cropping in Adobe Photoshop
After upgrading Photoshop, I experienced some new issues with the crop tool, especially when trying to crop artboards. Moving and rotating the crop on artboards seemed unnatural and I’ve found that sometimes when resizing the crop, I also unintentionally rotated the canvas. I even watched a video to relearn how to use the crop tool. In this video they revealed the classic crop option, which I’ve been using ever since. The classic crop option has been around since the release of Adobe CC but I had completely forgotten the option was available, probably because it’s hidden away behind a nondescript settings icon that can be difficult to find. If the default crop tool drives you crazy and makes you want to throw stuff around the room, then I highly recommend using the classic crop tool option. It’s much more familiar and predictable in how it works.
To enable classic crop mode, click on the crop tool, and then click on the gear icon that appears along the top of the screen. Add a checkmark next to the Use Classic Mode option. I also enabled the Enable Crop Shield option to help with accuracy when cropping.
Utilize the option to export individual layers in Photoshop
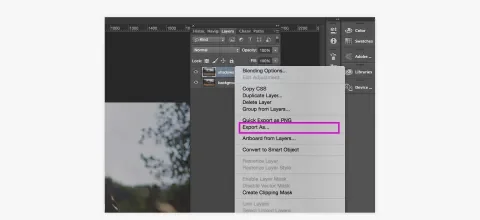
The Save for Web option has been labeled as legacy and seems like it’s being replaced with a general export. The shortcut command+option+shift+s still works for the save for web option, and there’s still a menu item for it, but I’ve embraced the new export option mostly because you can export individual layers. The option to export individual layers instead of using the slice tool has improved my workflow and I’ve found that in some cases, I can export assets much more quickly without worrying about creating multiple layers of slices to extract specific graphics from a design.
To export individual layers, select the layers you want to export in the layer panel and right click to reveal the menu. Choose the Export As option. To export multiple layers at once, shift+select or command+select the layers you want to export and then right click to reveal the menu. You can also select Quick Export as PNG if you don’t want to customize any of the settings before exporting.
There’s still more to learn
Learning the ins and outs of Illustrator and Photoshop CC 2015 is an ongoing process, and I’m sure I’ll continue to find better solutions for utilizing tools, settings, and preferences to their fullest. These were just a few I found that help me the most. I suggest visiting Adobe’s Learn & Support site for more in depth tutorials and want to learn more about what’s new in Adobe CC 2015. If you have a suggestion on a tool setting, preference, or something that has helped streamline your process when working in Photoshop or Illustrator CC 2015, we’d love to hear it!

