The previous article in this series explained how to send a Drupal Site into retirement using HTTrack—one of the solutions to maintaining a Drupal site that isn't updated very often. While this solution works pretty well for any version of Drupal, another option is using the Static Generator module to generate a static site instead. However, this module only works for Drupal 7 as it requires the installation of some modules on the site, and it uses Drupal to generate the results.
The Static Generator module relies on the XML sitemap module to create a manifest. The links in the XML sitemap serve as the list of pages that should be transformed into static pages. After generating the initial static pages, the Cache Expiration module keeps track of changed pages to be regenerated to keep the static site current. This combination of Static Generator, XML sitemap, and Cache Expiration is a good solution when the desire is to regenerate the static site again in the future, after making periodic updates.
There are many module dependencies, so quite a list of modules was downloaded and installed. Once installed, the high-level process is:
- Create and configure the XML sitemap and confirm it contains the right list of pages.
- Configure Cache expiration to use the Static Generator and expire the right caches when content changes.
- Go to /admin/config/system/static and queue all static items for regeneration.
- Click a Publish button to generate the static site.
Install Static Generator
The modules are downloaded and enabled using Drush. Enabling additional modules, like xmlsitemap_taxonomy, may be needed depending on the makeup of the site.
drush dl static expire xmlsitemap
drush en static_file, static_views, static_xmlsitemap, static_node, static
drush en expire
drush en xmlsitemap_menu, xmlsitemap_node, xmlsitemap
Configure XMLSitemap
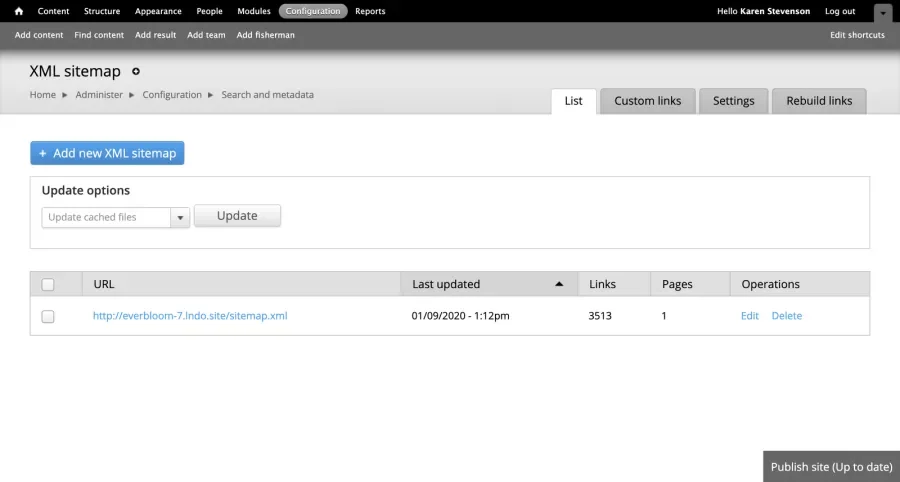
On /admin/config/search/xmlsitemap, make sure the site map is accurately generated and represents all pages that should appear in the static site. Click on the link to the sitemap to see what it contains.
- Add all content types whose paths should be public.
- Add menus and navigation needed to allow users to get to the appropriate parts of the site.
- Make sure Views pages are available in the map.
A lot of custom XML sitemap paths may be required for dynamic views pages. If so, generate XML sitemap links in the code where the database is queried for all values that might exist as a path argument, then create a custom link for each path variation.
Code to add custom XML sitemap links look like this (this is Drupal 7 code):
/**
 * Add a views path to xmlsitemap.
 *
 * @param string $path
 *   The path to add.
 * @param float $priority
 *   The decimal priority of this link, defaults to 0.5.
 */
function MYMODULE_add_xmlsitemap_link($path, $priority = '0.5') {
  drupal_load('module', 'xmlsitemap');

  // Create a unique namespace for these links.
  $namespace = 'MYMODULE';
  $path = drupal_get_normal_path($path, LANGUAGE_NONE);

  // See if link already exists.
  $current = db_query("SELECT id FROM {xmlsitemap} WHERE type = :namespace AND loc = :loc", array(
    ':namespace' => $namespace,
    ':loc' => $path,
  ))->fetchField();
  if ($current) {
    return;
  }

  // Find the highest existing id for this namespace.
  $id = db_query("SELECT max(id) FROM {xmlsitemap} WHERE type = :namespace", array(
    ':namespace' => $namespace,
  ))->fetchField();

  // Create a new xmlsitemap link.
  $link = array(
    'type' => $namespace,
    'id' => (int) $id + 1,
    'loc' => $path,
    'priority' => $priority,
    'changefreq' => '86400', // 1 day = 24 h * 60 m * 60 s
    'language' => LANGUAGE_NONE
  );

  xmlsitemap_link_save($link);
}
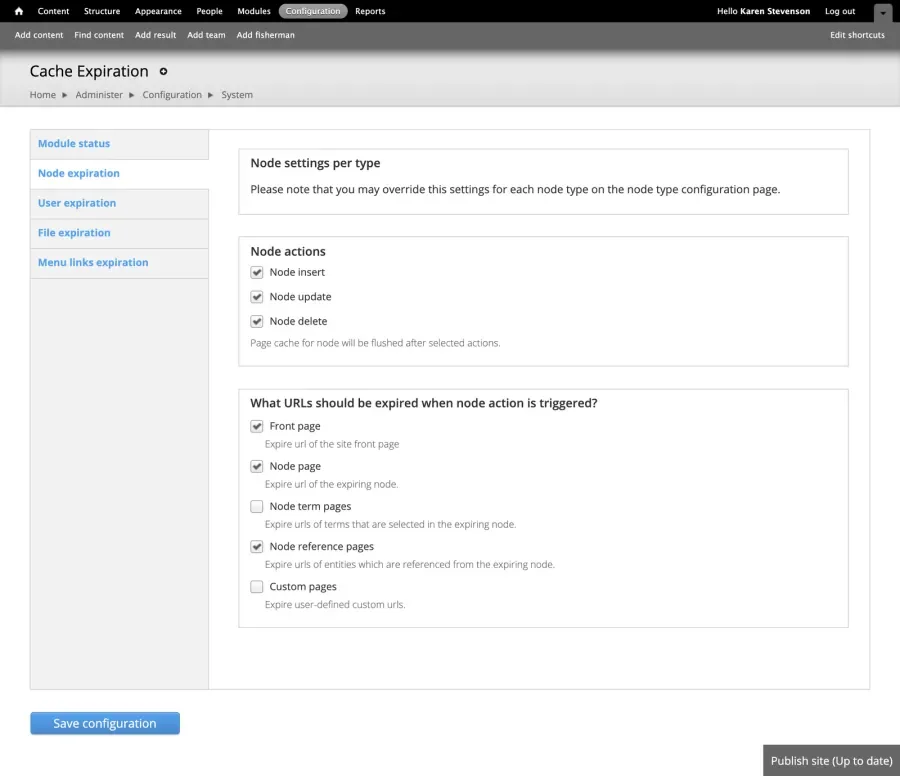
Configure Cache Expiration
On admin/config/system/expire, set up cache expiration options. Make sure that all the right caches will expire when content is added, edited, or deleted. For instance, the home page should expire any time nodes are added, changed, or deleted since the changed nodes change the results in the view of the latest content that appears there.
Generate the Static Site
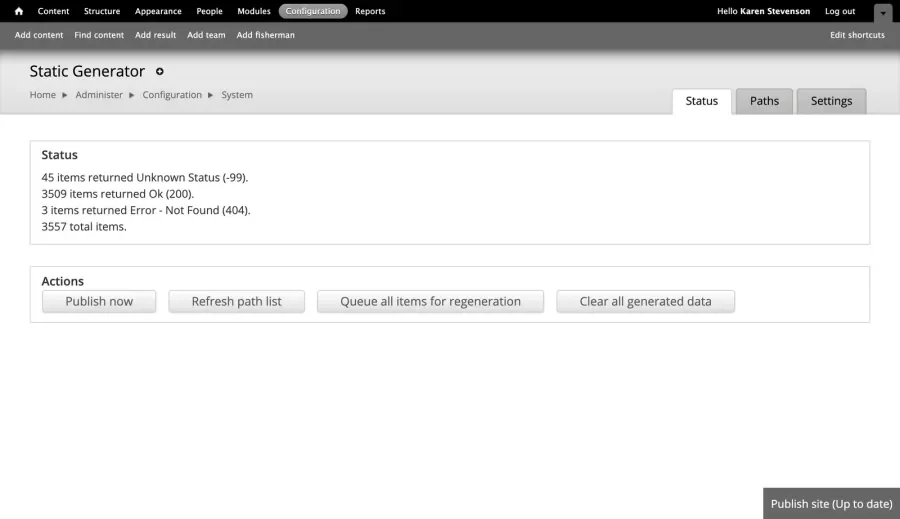
Once configured, a Publish Site button appears on every page, which is a shortcut. But the first time through, it’s better to visit /admin/config/system/static to configure static site options and generate the static site. Some pages were created automatically, and others not during the initial setup. Once all other modules are configured, and the XML sitemap looks right, clear all the links and regenerate the static site.
The location where the static site is created can be controlled, but the default location is at the path, /static/normal, in the same repository as the original site. That location and other settings are configured on the Settings tab.
Generate the static site and ensure all the pages are accounted for and work correctly. This is an iterative process due to the discovery of missing links from the XML sitemap and elsewhere. Circle through the process of updating the sitemap and then regenerate the static site as many times as necessary.
The process of generating the static site runs in batches. It might also run only on cron depending on what options are chosen in settings. Uncheck the cron option when generating the initial static site and later use cron just to pick up changes. Otherwise, running cron multiple times to generate the initial collection of static pages is required.
For a 3,500 page site, it takes about seven minutes to generate the static pages. Later updates should be faster since only changed pages would have to be regenerated.
When making changes later, they need to be reflected in the XML sitemap before they will be picked up by Static Generator. If XML sitemap updates on cron, run cron first to update the sitemap, then update the static pages.
After generating the static site and sending it to GitHub, it was clear that the Static Generator module transforms a page like /about into the static file /about.html, then depends on an included .htaccess file that uses mod_rewrite to redirect requests to the right place. But, GitHub Pages won’t recognize mod_rewrite. That makes the Static Generator a poor solution for a site to be hosted on Github Pages, although it should work fine on sites where mod_rewrite will work.
Comparing HTTrack and Static Generator Options
Here’s a comparison of a couple of methods explored when creating a static site:
- HTTrack will work on any version of Drupal, Static Generator, only on Drupal 7.
- HTTrack doesn’t require setup other than the standard preparation of any site, which is required for any static solution. Static Generator took some time to configure, especially since there wasn’t an existing XML sitemap and Cache Expiration installed and configured.
- HTTrack can take quite a while to run, a half-hour to an hour, possibly longer. Static Generator is much faster—seven minutes for the initial pass over the whole site.
- The Static Generator solution makes the most sense if there is a need to keep updating the site and regenerating the static pages. That situation justifies the up-front work required to configure it. HTTrack is easier to set up for a one-and-done situation.
- The file pattern of /about/about.html created by our custom HTTrack arguments works fine for managing internal links on Github Pages. The file pattern of /about.html created by Static Generator will not correctly manage internal links on Github Pages. The second pattern will only work on a host that has mod_rewrite installed and the appropriate rules configured in .htaccess.
Github Pages or the Static Generator module make excellent solutions. To view an example of a site generated with HTTrack, go to https://everbloom.us.