BigPipe is a technique pioneered by Facebook that’s used to lazy-load content into a webpage. From the user’s perspective, the “frame” of a webpage will appear immediately, and then the content will pop in place when it’s ready. BigPipe has been included as a module in Drupal core since 8.1.x, and is very simple— just enable the module.
On my latest project, I'm using it to lazy-load content that’s generated from a very slow API call. The functionality works great out of the box, but we noticed a user-experience problem where the end-user would see a big blank area while the API call was waiting on a response. This behavior made the website seem broken. To fix this, we decided to implement a simple loading animation.
Finding the CSS selector to attach the animation to wasn’t as simple as I hoped it would be.
Spoiler: Let’s see the code
Looking for the code, and not the process? The CSS selector to target is below. Note that you’ll want to qualify this within a parent selector, so the loader doesn’t appear everywhere.
.parent-selector [data-big-pipe-placeholder-id] {
  /* Loading animation CSS */
}
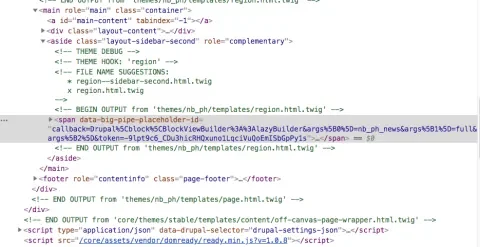
BigPipe’s placeholder markup is only one <span> element, which makes styling tricky. Luckily, we can make use of CSS pseudo-selectors to make a Facebook-style throbber animation.
Here is some Sass with easy-to-use variables:
$pulse-duration: 0.2s;
$pulse-color: rebeccaPurple;

@keyframes pulse-throbber {
  0% {
    opacity: 1;
    transform: scaley(1);
  }

  100% {
    opacity: 0.2;
    transform: scaley(0.5);
  }
}


[data-big-pipe-placeholder-id] {
  position: relative;
  display: block;
  margin: 20px auto;
  width: 6px;
  height: 30px;
  background: $pulse-color;
  animation: pulse-throbber $pulse-duration infinite;
  animation-delay: ($pulse-duration / 3);
  animation-direction: alternate;

  &:before,
  &:after {
    content: '';
    position: absolute;
    display: block;
    width: 100%;
    height: 100%;
    background: $pulse-color;
    top: 0;
    animation: pulse-throbber $pulse-duration infinite;
    animation-direction: alternate;
  }

  &:before {
    left: -12px;
  }

  &:after {
    left: 12px;
    animation-delay: ($pulse-duration / 1.5);
  }
}
Tracking down the placeholder’s CSS selector
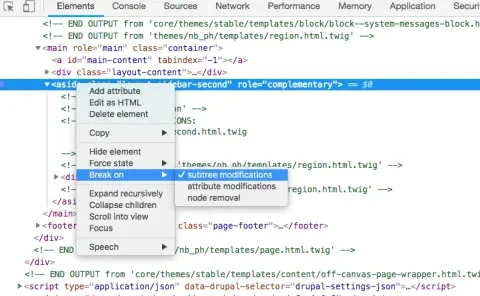
Finding this selector wasn’t as simple as I initially hoped. The first technique that I tried was setting a DOM breakpoint in Chrome Developer Tools. This functionality allows you to pause the execution of JavaScript when a DOM element’s attributes change, the element gets removed, or any descendant DOM elements are modified.
In our case, we want to set a breakpoint when any descendant element is modified and then reload the page. Hopefully, when BigPipe inserts the rendered HTML, the breakpoint will trigger, and we can then inspect the placeholder HTML to find the appropriate CSS selector.
Unfortunately, this didn’t work. Why? I’m still not sure. This appears to be a bug within Google Chrome. I created an issue within the Chromium bug tracker and will update this article when there’s progress.
PHP Breakpoints to the rescue!
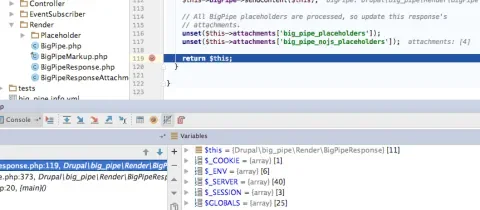
Because I know I’m using the BigPipe module to stream the content in, the next step is setting a PHP breakpoint within the BigPipe module within PHPStorm. I ended up setting a breakpoint within the sendContent() function within BigPipeResponse.php. This had the expected result of pausing the lazy-loading of the content, which enabled me to easily inspect the HTML (by halting the injection of the BigPipe content) so I could find the placeholder’s selector.
Conclusion
Sometimes a seemingly simple theming task ends up being tricky. It’s important to understand proper front-end and backend debugging techniques because you never know when you’re going to need them in a pinch. Hopefully, this article will save someone from having to go through this process.
Photo by Jonny Caspari on Unsplash


