In this article I am going to provide a brief overview of React Native and explain how you can start using it to build your native mobile apps today.
What’s all the fuss?
Having to write the same logic in different languages sucks. It’s expensive to hire separate iOS and Android developers. Did you know you could also be using your web developers to build your mobile apps?
There have been many attempts to utilize web development technologies to spit out an iOS or Android app with the most common being PhoneGap or Titanium. Nevertheless, there have always been issues with their approaches such as non-native UI, memory or performance limitations, and a lack of community support.
Enter React Native. For me, there are two key points as to why I think React Native is here to stay.
1. It brings React to mobile app development
At Lullabot, we think React is awesome. Developers *enjoy *building applications in React. Over recent years, there have been countless JavaScript frameworks and libraries but React seem to have gotten the formula just right. For a more detailed comparison, see this article by our very own John Hannah.
The approach behind React is to “Learn once, write anywhere” and React Native lets developers use React to write both iOS and Android apps. That doesn’t mean you can also use the same code for web, but being able to use the same developers across platforms is a huge win for boosting productivity and dropping costs.
2. It’s native
With React Native, there isn’t really a compromise to building your app in JavaScript. You get to use the language you know and love. Then, as if by magic, you get a fully native app.
React Native comes with a bunch of core APIs and components that we can use to build our native apps. What’s more, there is a lot of effort put into platform parity through single components instead of having separate iOS and Android components for functionality that is very similar. For an example, see Alert.
A source of confusion for beginners is whether they should still build a separate app for iOS and Android. That ultimately comes down to how different you want the apps to be. When I built my first app on React Native, Kaiwa, I only had a single codebase and almost all of the code was the same for both platforms. For the times when you need to target a specific platform, you can easily implement Platform Specific Code.
Prerequisites
There are a few things you should do before starting with React Native.
JavaScript & ES6
You’ll want to know JavaScript, that’s for sure. If you’re developing in JavaScript any time from 2015 onwards, you’ll definitely want to start using ES6 (a.k.a. ECMAScript 2015). ES6 does a great job at helping you write cleaner and more concise code. Here is the cheat sheet that I use.
React
You’ll need to know how React works. When I first started, I thought that React Native would be a totally different ball game to React. Because it’s for mobile, not web, right? Wrong. It’s the same.
The official documentation does a good job of getting you started. A page that I have at hand at all times when working with React is Component Specs and Lifecycle. It covers one of the topics that will definitely feel foreign when you first start with React. But before you know it, you won’t be able to live without it.
Devices
If you’re developing for iOS and Android you’re ideally going to have both iOS and Android devices to test on. You can get away with just using simulators for the most part but there are definitely differences when using actual devices that you’re going to want to know about. For example, devices act differently depending on power settings and the iOS simulator doesn’t accept push notifications.
If you’re shipping an app, buy devices. They don’t have to be brand-spanking-new, any old used thing from eBay will probably be fine, however, you will need a device that can run at least iOS 7 or Android 4.1. It’s also worth noting that you cannot submit an app to the Apple App Store without an iOS device.
Software
To build for iOS, you’re going to need Xcode which requires a Mac. Xcode has a simulator built in for iOS development. For Android, I use Genymotion as an alternative to the stock Android emulator but you can also connect an Android device via USB or Wi-Fi and debug directly on that.
Getting Started
This guide will help Mac users get started with React Native. If you’re on Linux or Windows, don’t worry! The official documentation has you covered.
Install Homebrew if you’ve been living under a rock. Then use this to install Node.
brew install node
Install the React Native CLI which allows you to play with your projects from the command line.
npm install -g react-native-cli
Optionally, install Watchman. It makes things faster so why not?
brew install watchman
For Android, you’ll need to install Android Studio which gives you the Android SDK and Emulator. For more, see these steps.
Set up your first project. I highly recommend that you do this as opposed to creating the project from scratch yourself. It creates all the files, folders and configurations you will need to compile a native app on either iOS or Android.
react-native init MyApp
From within the new directory for your app, run either of these commands to start testing your app on iOS or Android.
react-native run-ios
react-native run-android
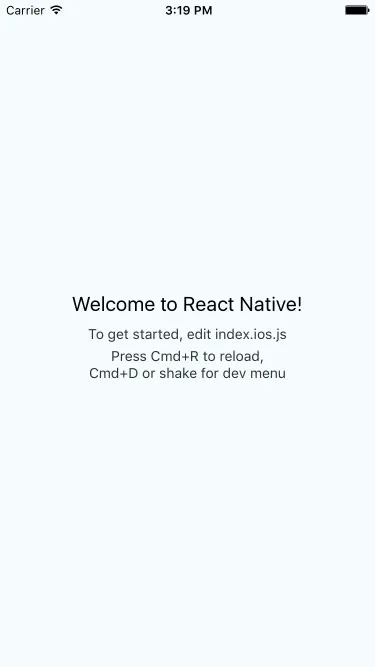
For iOS, you should see the Xcode iPhone simulator launch automatically with your app. If you wish, you can open Xcode and launch the app using ⌘ + R instead. For Android, If you’ve got an emulator running or you’ve set up your device for USB debugging then that will automatically launch with your app too. Job done!
Debugging
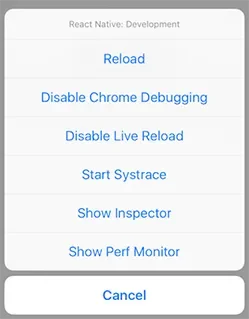
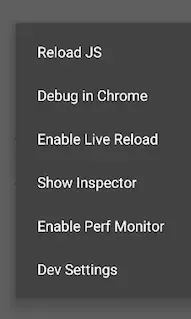
Being able to debug your app is crucial to efficient development. First, you’re going to want to know how to access the developer menu whist your app is running.
For iOS, shake the device or hit ⌘ + D in the simulator.
For Android, shake the device or press the hardware menu button.
Web Developers may be familiar with the concept of LiveReload. By enabling this from the developer menu, any changes to your JS will trigger an automatic reload on any active app. This feature really got my blood pumping the first time I started with React Native. In comparison to working natively, it definitely speeds up development time.
Want another slice of awesome for web developers? By selecting Debug JS Remotely from the developer menu, you can debug your JavaScript in Chrome DevTools. Some tips:
- console.log until your heart is content.
- Enable Pause on Caught Exceptions and throw in debugger statements.
- Place breakpoints under the Sources tab.
- React Developer Tools doesn’t work with React Native, but the Nuclide package for Atom is a great alternative.
Tips and tricks for building your first app
These are some of the things that I wish someone had told me before I started working with React Native. I hope they can help you!
Know where to find components
You’re building your app in React. That means you’re going to write React Components. React Native provides a lot of components and APIs out of the box (see official docs for more). I was able to write the majority of my first app with only core components. However, if you can’t find a component for your specific use-case, its quite possible someone else has already made it. Head to the Awesome React Native GitHub repo and your mind will be blown with how many contributions the community is making.
Flexbox
Do you know what Flexbox is? If not, here is an article to start learning about it right now. You’re going to be using Flexbox extensively for laying out elements in your UI. Once you get past the learning curve, Flexbox is great and you’ll want to start using it on all your web projects too.
By default, React Native sets the deployment target device to iPhone within Xcode. You can change this to Universal so that your app will scale correctly on iPad too.
Test
Don’t assume the simulators are enough. Devices can act differently when it comes to things such as keyboards, web sockets, push notifications, performance etc. Also, don’t forget landscape! Lots of people test their app only in portrait and get a shock the first time they rotate.
Don’t stress about the release cycle
At the time of writing this article, a new version of React Native is released every 2 weeks. That’s a really fast release cycle. It’s inspiring to see how much momentum is in the community right now. However, my advice is to not worry if you’re finding it hard to keep up to date. Unless there is a specific feature or bug fix you need, it can be a lot of work upgrading and there are often regressions. You can keep an eye on release notes here.
Navigation
Navigation and routing play a major role in any mobile app. There has been some confusion around Navigator, NavigatorIOS and the recent NavigationExperimental components. Read this comparison for a clear overview. TL;DR Go with NavigationExperimental.
Data flow
Consider some sort of Flux architecture. Although not exactly Flux, Redux is probably the most popular pattern for React apps at present. It’s a great way to have data flow through your app. I found it invaluable for implementing things such as user login. If you’re new to React, I recommend that you read the examples over at Thinking In React before approaching data flow techniques for your app.
Summary
React Native is riding a wave at the moment. The recent announcement that Microsoft and Samsung are also backing React Native will only increase its popularity. Although there may be cases where its not the right fit, I do highly recommend considering it for your next mobile project.
Want to learn more? I’ll be presenting on this topic at ForwardJS in San Francisco, July 2016.


