Varnish is a very popular software package that can dramatically accelerate the work of serving HTTP pages. Varnish caches fully-rendered responses to HTTP requests and serves them without the delay of building content from scratch. Because it's so much more efficient than building a page with Apache and Drupal, Lullabot regularly deploys Varnish when a site needs to handle high levels of anonymous traffic. In many situations, installing Varnish on the same machine as MySQL and Apache can help squeeze more performance out of a single box. However in most of our deployments, we're working with "high availability" setups, where dedicated servers handle different functions and redundant backup servers are on hand for every piece of the infrastructure. That means two database servers, two web servers, two Varnish servers, and so on.
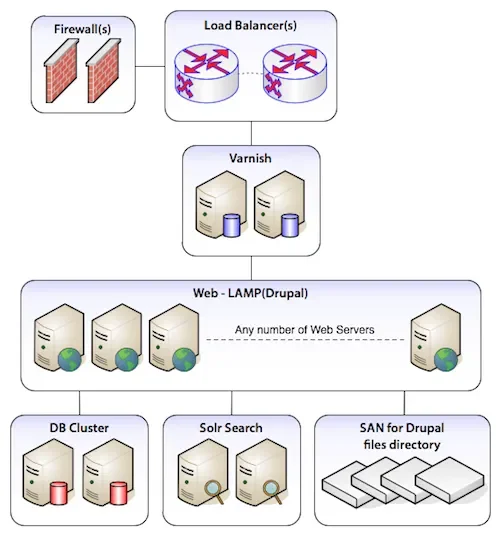
A typical Drupal high-availability setup with Varnish.
This article is all about configuring Varnish optimally for these high-availability setups, in which multiple dedicated back-end servers are protected from heavy traffic by Varnish serving cached content to the outside world. We also have some neat tricks for server maintenance, optimizing your cached content, and configuring Varnish to act as a fail-safe even if all of your back-end servers go down.
Basic Varnish Configuration
Varnish usually has three locations of configuration. The boot script, the system-wide configuration, and the VCL file that does most of the work. The first script that starts up Varnish is usually located with the rest of your system startup scripts at /etc/init.d/varnish. This file rarely needs adjustments, but it can be interesting to read or help you locate further configuration (since the startup script is responsible for calling the next file). The second file is usually located at /etc/sysconfig/varnish (on CentOS and RedHat machines) or /etc/default/varnish (on Ubuntu). This file defines global configuration for Varnish such as which port it should run on and where it should store its cache. Typically it contains 5 different ways of writing the same thing. It doesn't matter which option you use: just be sure to change your storage backend. The default is usually "file", which stores cached information on disk. Be absolutely sure to change this to "malloc", which stores information in memory! If you don't have enough memory in your box for a decent sized cache (say a few gigabytes), consider a memory upgrade. Here's a configuration that we have running on a very popular site with a large number of images and pages being cached (this is using the "Option 2" in the /etc/sysconfig/varnish file):
DAEMON_OPTS="-a :80,:443 \
             -T localhost:6082 \
             -f /etc/varnish/default.vcl \
             -u varnish -g varnish \
             -S /etc/varnish/secret \
             -p thread_pool_add_delay=2 \
             -p thread_pools=<Number of CPU cores> \
             -p thread_pool_min=<800 / Number of CPU cores> \
             -p thread_pool_max=4000 \
             -p session_linger=50 \
             -p sess_workspace=262144 \
             -s malloc,3G"
The last line is the most important to set up. In this case we're allocating 3GB of memory for Varnish's dedicated use. Also note the paths used in this file that reference which VCL file you will use. It's probably best to stick with whatever file path your distribution uses. The lines above for <Number of CPU cores>, be sure to replace with actual server information. You can get information about the number of processors in your machine by running grep processor /proc/cpuinfo, which will return a line for each processor core you have available.
VCL Configuration
The VCL file is the main location for configuring Varnish and it's where we'll be doing the majority of our changes. It's important to note that Varnish includes a large set of defaults that are always automatically appended to the rules that you have specified. Unless you force a particular command like "pipe", "pass", or "lookup", the defaults will be run. Varnish includes an entirely commented-out default.vcl file that is for reference. We'll be going through each of the sections individually down below, but for ease of reading here's a complete copy of the VCL file that we're currently using, and a copy of the defaults that Varnish will automatically append to our own rules. Updated 4/9/2012: I've added an updated VCL and examples here for Varnish 3, which differs slightly from the Varnish 2 configuration.
- Lullabot's default.vcl for multiple web servers (for Varnish 2.1.x)
- Lullabot's default.vcl for multiple web servers (for Varnish 3.x)
- View the set of defaults (as of Varnish 2.1.3)
Now let's get started walking through the most interesting stuff, the VCL!
Health Checks and Directors
A more recent feature of Varnish (2.x and higher) has been the addition of "directors" to send traffic to any number of web servers. These directors can do regular health checks on each web server to see if the server is still running smoothly. If Varnish receives a request for an asset that it hasn't yet cached, it will only pass on the request to a "healthy" server. Our VCL file is typically set up to handle both HTTP and HTTPS traffic, so we need to define a list of web servers by their IP address twice; once for port 80 which provides normal pages and again for port 443 for secure connections. If you've set up Apache on a different port, reference that port here.
# Define the list of backends (web servers).
# Port 80 Backend Servers
backend web1 { .host = "192.10.0.1"; .probe = { .url = "/status.php"; .interval = 5s; .timeout = 1s; .window = 5;.threshold = 3; }}
backend web2 { .host = "192.10.0.2"; .probe = { .url = "/status.php"; .interval = 5s; .timeout = 1s; .window = 5;.threshold = 3; }}

# Port 443 Backend Servers for SSL
backend web1_ssl { .host = "192.10.0.1"; .port = "443"; .probe = { .url = "/status.php"; .interval = 5s; .timeout = 1 s; .window = 5;.threshold = 3; }}
backend web2_ssl { .host = "192.10.0.2"; .port = "443"; .probe = { .url = "/status.php"; .interval = 5s; .timeout = 1 s; .window = 5;.threshold = 3; }}

# Define the director that determines how to distribute incoming requests.
director default_director round-robin {
  { .backend = web1; }
  { .backend = web2; }
}

director ssl_director round-robin {
  { .backend = web1_ssl; }
  { .backend = web2_ssl; }
}

# Respond to incoming requests.
sub vcl_recv {
  # Set the director to cycle between web servers.
  if (server.port == 443) {
    set req.backend = ssl_director;
  }
  else {
   set req.backend = default_director;
  }
}
The last part of the configuration above is part of our vcl_recv sub-routine. It's what defines which set of servers will be used based on the port by which Varnish received the traffic. It's a good idea then to set up a reasonable health check on each web server to make sure that server is ready to deliver traffic. We use a file located directly in the root of the web server called "status.php" to check if the web server is healthy. This file does a few checks including:
- Bootstrapping Drupal
- Connecting to the Master database
- Connecting to the Slave database (if any)
- Connecting to Memcache (if in use)
- Checking that the files directory is accessible
If any of these checks fail, the file throws a 500 server error and Varnish will take the web server out of rotation. The status.php file is also extremely useful for intentionally taking a web server out of rotation. Simply move the status.php file to a new location (like status-temp.php) and Varnish will automatically remove the server from rotation while the server itself stays up so that it may be serviced independently of the other web servers. This approach is common when performing upgrades or installations of new software on the web servers.
While our status.php script is fairly universal, it may require some tweaking for your own purposes. If you have additional services that are required for a server to function properly, adding additional checks to the script will ensure Varnish doesn't cache bad data from a broken server.
Caching Even if Apache Goes Down
Even in an environment where everything has a redundant backup, it's possible for the entire site to go "down" due to any number of causes. A programming error, a database connection failure, or just plain excessive amounts of traffic. In such scenarios, the most likely outcome is that Apache will be overloaded and begin rejecting requests. In those situations, Varnish can save your bacon with the Grace period. Apache gives Varnish an expiration date for each piece of content it serves. Varnish automatically discards outdated content and retrieves a fresh copy when it hits the expiration time. However, if the web server is down it's impossible to retrieve the fresh copy. "Grace" is a setting that allows Varnish to serve up cached copies of the page even after the expiration period if Apache is down. Varnish will continue to serve up the outdated cached copies it has until Apache becomes available again. To enable Grace, you just need to specify the setting in vcl_recv and in vcl_fetch:
# Respond to incoming requests.
sub vcl_recv {
  # Allow the backend to serve up stale content if it is responding slowly.
  set req.grace = 6h;
}

# Code determining what to do when serving items from the Apache servers.
sub vcl_fetch {
  # Allow items to be stale if needed.
  set beresp.grace = 6h;
}
Both of these settings can be the same, but the setting in vcl_fetch must be longer than the setting in vcl_recv. Think of the vcl_fetch grace setting as "the maximum time Varnish should keep an object". The setting in vcl_recv on the other hand defines when Varnish should use a stale object if it has one. Just remember: while the powers of grace are awesome, Varnish can only serve up a page that it has already received a request for and cached. This can be a problem when you're dealing with authenticated users, who are usually served customized versions of pages that are difficult to cache. If you're serving uncached pages to authenticated users and all of your web servers die, the last thing you want is to present them with error messages. Instead, wouldn't it be great if Varnish could "fall back" to the anonymous pages that it does have cached until the web servers came back? Fortunately, it can -- and doing this is remarkably easy! Just add this extra bit of code into the vcl_recv sub-routine:
# Respond to incoming requests.
sub vcl_recv {
  # ...code from above.

  # Use anonymous, cached pages if all backends are down.
  if (!req.backend.healthy) {
    unset req.http.Cookie;
  }
}
Varnish sets a property req.backend.health if any web server is available. If all web servers go down, this flag becomes FALSE. Varnish will strip the cookie that indicates a logged-in user from incoming request, and attempt to retrieve an anonymous version of the page. As soon as one server becomes healthy again, Varnish will quit stripping the cookie from incoming requests and pass them along to Apache as normal.
Making Varnish Pass to Apache for Uncached Content
Often when configuring Varnish to work with an application like Drupal, you'll have some pages that should absolutely never be cached. In those scenarios, you can easily tell Varnish to not cache those URLs by returning a "pass" statement.
# Do not cache these paths.
if (req.url ~ "^/status\.php$" ||
    req.url ~ "^/update\.php$" ||
    req.url ~ "^/ooyala/ping$" ||
    req.url ~ "^/admin/build/features" ||
    req.url ~ "^/info/.*$" ||
    req.url ~ "^/flag/.*$" ||
    req.url ~ "^.*/ajax/.*$" ||
    req.url ~ "^.*/ahah/.*$") {
     return (pass);
}
Varnish will still act as an intermediary between requests from the outside world and your web server, but the "pass" command ensures that it will always retrieve a fresh copy of the page. In some situations, though, you do need Varnish to give the outside world a direct connection to Apache. Why is it necessary? By default, Varnish will always respond to page requests with an explicitly specified "content-length". This information allows web browsers to display progress indicators to users, but some types of files don't have predictable lengths. Streaming audio and video, and any files that are being generated on the server and downloaded in real-time, are of unknown size, and Varnish can't provide the content-length information. This is often encountered on Drupal sites when using the Backup and Migrate module, which creates a SQL dump of the database and sends it directly to the web browser of the user who requested the backup. To keep Varnish working in these situations, it must be instructed to "pipe" those special request types directly to Apache.
# Pipe these paths directly to Apache for streaming.
if (req.url ~ "^/admin/content/backup_migrate/export") {
  return (pipe);
}
Finally, while we're discussing paths that need exceptions, Varnish is also a good place to restrict access to specific URLs. Because the VCL file is so flexible, it can be a good place to lock down paths that should never be seen by the outside world. Up at the very top of our VCL file, we have a line that defines an access control list of IP addresses. These addresses are considered to be "internal" to our environment. A common example is restricting public access to Drupal's cron.php file so that only local web servers can trigger expensive tasks like search indexing. Since the local web servers all have IP addresses that begins with "192.10.", they are granted access while all others receive an access denied message At the top of the default.vcl file:
# Define the internal network subnet.
# These are used below to allow internal access to certain files while not
# allowing access from the public internet.
acl internal {
  "192.10.0.0"/24;
}
An then inside of vcl_recv:
# Respond to incoming requests.
sub vcl_recv {
  # ...code from above.

  # Do not allow outside access to cron.php or install.php.
  if (req.url ~ "^/(cron|install)\.php$" && !client.ip ~ internal) {
    # Have Varnish throw the error directly.
    error 404 "Page not found.";
    # Use a custom error page that you've defined in Drupal at the path "404".
    # set req.url = "/404";
  }
}
Optimizing Varnish's Cache
First, let's dissect a very popular but misguided configuration that's made the rounds on the internet. When describing how to serve cached content to users with cookies, a number of sources recommended this solution:
# Routine used to determine the cache key if storing/retrieving a cached page.
 sub vcl_hash {
  # Do NOT use this unless you want to store per-user caches.
  if (req.http.Cookie) {
    set req.hash += req.http.Cookie;
  }
}
Generally, this is not a useful approach unless you're serving up the same page to a single user repeatedly. It will recognize the unique cookie that Drupal gives to every logged in user, and use it to keep cached content for one user from being displayed to another. However, this approach is a waste: Drupal explicitly returns a Cache-Control header for all authenticated users that prevents Varnish from caching their content:
Cache-Control: no-cache, must-revalidate, post-check=0, pre-check=0
In other words, don't use this approach unless you have an explicit reason to cache authenticated pages. In most situations, this approach will add overhead without caching anything. In the worst case scenario, it will fill up your cache with entries for each authenticated user and push out more valuable anonymous pages that can be reused for thousands of visitors. In most cases, the best approach is to maintain a single cache that is used for all users. Any content that cannot be served to all users can be passed through to Apache. Because Drupal uses a cookie to indicate the account of a logged in user, the easiest way to spot requests that need fresh, un-cached content is ignore requests with cookies. However, that cookie will also be added to requests for images, JavaScript files, CSS files, and other supporting media assets. Although the HTML page itself is likely to change for logged in users, there's no reason that Varnish can't serve up cached versions of the support assets. Taking this into consideration, it's a good idea to discard any cookies that are sent by the browser when requesting such files:
# Respond to incoming requests.
sub vcl_recv {
  # ...code from above.

  # Always cache the following file types for all users.
  if (req.url ~ "(?i)\.(png|gif|jpeg|jpg|ico|swf|css|js|html|htm)(\?[a-z0-9]+)?$") {
    unset req.http.Cookie;
  }
}
So far, so good. Stripping cookies from requests for static files allows them to be cached for both anonymous and authenticated users. While it works fine for out-of-the-box Drupal sites, however, there are unfortunately quite a few other ways that cookies can be set on your site. The most common culprits are statistics tracking scripts (like Google Analytics) and advertising servers. Ad scripts in particular have a terrible habit of setting cookies through JavaScript. For the most part, Varnish and Drupal are not concerned at all with these cookies, but since any cookie passed by the browser will cause Varnish to pass the request to Apache, we need to take care of them. There are multiple approaches to handling this problem, and most administrators start by trying to build a "blacklist" of cookies to strip out from the request, leaving only the ones in which they have interest. This usually results in a configuration file that look something like this:
// Remove has_js and Google Analytics __* cookies.
set req.http.Cookie = regsuball(req.http.Cookie, "(^|;\s*)(__[a-z]+|has_js)=[^;]*", "");
This approach will usually work for a short period of time, but as soon as an ad script or some new piece of JavaScript adds a cookie (like Comment module, Flag module, or any of many other modules), Varnish will cease to cache the page. You'll have to track down the new cookie and add it to the blacklist manually. Instead, we use an "inclusion" list, where all cookies but a few will be automatically stripped from the request. This logic is a lot more verbose, but it is definitely a more sustainable solution:
# Respond to incoming requests.
sub vcl_recv {
  # ...code from above.

  # Remove all cookies that Drupal doesn't need to know about. ANY remaining
  # cookie will cause the request to pass-through to Apache. For the most part
  # we always set the NO_CACHE cookie after any POST request, disabling the
  # Varnish cache temporarily. The session cookie allows all authenticated users
  # to pass through as long as they're logged in.
  if (req.http.Cookie) {
    set req.http.Cookie = ";" + req.http.Cookie;
    set req.http.Cookie = regsuball(req.http.Cookie, "; +", ";");
    set req.http.Cookie = regsuball(req.http.Cookie, ";(SESS[a-z0-9]+|NO_CACHE)=", "; \1=");
    set req.http.Cookie = regsuball(req.http.Cookie, ";[^ ][^;]*", "");
    set req.http.Cookie = regsuball(req.http.Cookie, "^[; ]+|[; ]+$", "");

    if (req.http.Cookie == "") {
      # If there are no remaining cookies, remove the cookie header. If there
      # aren't any cookie headers, Varnish's default behavior will be to cache
      # the page.
      unset req.http.Cookie;
    }
    else {
      # If there are any cookies left (a session or NO_CACHE cookie), do not
      # cache the page. Pass it on to Apache directly.
      return (pass);
    }
  }
}
Once you've tamed cookies, there's one other "enemy" of caching you need to plan for: the "Accept-Encoding" header sent by different browsers. Each browser sends information to the server about what kind of caching mechanisms it supports. All modern browsers now support "gzip" compression, but they all inform the server that they support it in different ways. For example, the header of modern browsers will report Accept-Encoding the following ways: Firefox, IE: gzip, deflate Chrome: gzip,deflate,sdch Opera: deflate, gzip, x-gzip, identity, *;q=0 In addition to the headers sent by the browser, Varnish must also pay attention to the headers sent by Apache, which usually include lines like this:
Vary: Accept-Encoding
This means that Varnish will store a different cache for every version of the "Accept-Encoding" header it receives from different browsers! That means you'll be maintaining separate cached copies of your web site for each different browser, and in some cases for different versions of the same browser. This is a huge wast of space, since every browser actually supports "gzip", but just reports it differently. To prevent this confusion, we include this segment in vcl_recv:
# Handle compression correctly. Different browsers send different
# "Accept-Encoding" headers, even though they mostly all support the same
# compression mechanisms. By consolidating these compression headers into
# a consistent format, we can reduce the size of the cache and get more hits.
# @see: http:// varnish.projects.linpro.no/wiki/FAQ/Compression
if (req.http.Accept-Encoding) {
  if (req.http.Accept-Encoding ~ "gzip") {
    # If the browser supports it, we'll use gzip.
    set req.http.Accept-Encoding = "gzip";
  }
  else if (req.http.Accept-Encoding ~ "deflate") {
    # Next, try deflate if it is supported.
    set req.http.Accept-Encoding = "deflate";
  }
  else {
    # Unknown algorithm. Remove it and send unencoded.
    unset req.http.Accept-Encoding;
  }
}
Conclusions
Varnish is an amazing and incredibly efficient tool for serving up common resources from your site to end-users. Besides simply making your site faster, it also can add additional redundancy to your setup by acting as a full backup if the web servers fail. In order to make Varnish both serve as an effective backup and efficient caching layer, it needs to clean up incoming headers from the browser, strip down cookies, and consolidate the "Accept-Encoding" header. After such extensive explanations it's easy to get overwhelmed, but the good news is that the VCL file provided here can quickly be deployed to almost any Drupal site and start working immediately. For most sites no further customization is needed, and sites that need to tweak it will have a good head start towards huge reductions in server load. On our sites, Varnish is usually able to handle about 85% of the traffic without ever touching the web servers. Even during peak times with hundreds of thousands of requests coming in per hour, Varnish can hum along at less than 5% CPU usage of an average 4-core server. Instead of scaling out your web servers horizontally, adding a few Varnish machines in front of them can save a huge amount of processing and speed up your site at the same time. If you haven't already, grab the actual default.vcl file that we use on our sites and read it through start to finish. Now with all of the individual pieces explained in-depth above, we hope you can use it as a starting point for your own VCL configuration. Happy caching!