It is a very exciting time for CSS authors. Long-awaited features are landing across browsers and at shocking speed. One new feature we are excited about is Cascade Layers. Cascade Layers is a new mechanism to help control when styles override others. Best of all, it is supported in all evergreen browsers so that you can use it right now!
First, let's look at the problem cascade layers intend to solve.
The problem with specificity
Cascade layers help solve the problem of specificity escalation. Specificity escalation is a problem where your styles get more and more specific, not to achieve a more narrow selection of elements but simply to override previous styles.
For example, say you have a button element that gets some styles from a framework. You need to override some of the button styles so you target its class selector.
.my-button { /* override styles */ }Yet, your styles don't take. After investigation, you realize that the framework styled the button with two classes as part of the selector, defeating your single class's specificity.
So you style the button with two classes just to get your styles to apply.
.my-button.my-button--primary { /* override styles */ }Later, you need to override the button again. This time, you'll need three classes in your selector or an element or ID. If you're really desperate, you throw on an !important. This can get messy quickly and lead to styles that are difficult to change.
How can cascade layers help with this problem?
A quick introduction to layers
Cascade Layers offer a method of direct control over specificity. It uses a new at-rule, @layer, to group styles in priority order.
For example, take the following button markup.
<button class="greetings">Hello, world!</button>Let's say we have some styles that apply a different value to the same property.
.greetings {
  background-color: purple;
}

button {
  background-color: green;
}
Here, the button will have a purple background. The class selector .greetings takes priority over the element selector button.
We could rewrite this example using cascade layers so the button background is green.
@layer low, high;

@layer low {
  .greetings {
    background-color: purple;
  }
}

@layer high {
  button {
    background-color: green;
  }
}
The selector inside the high layer has lower specificity than the selector inside the low layer. Yet, the high layer itself takes priority over the low layer.
All browsers supporting cascade layers display them inside the dev tool panel.
How does this work? To find an answer, we first need to dig into what happens with specificity in the cascade without layers.
The "regular" cascade and specificity
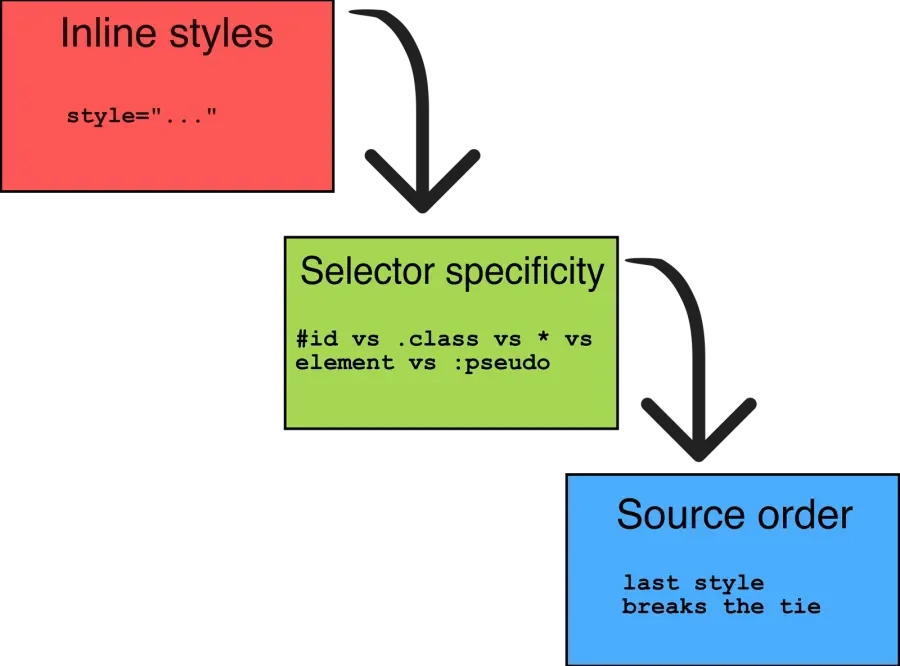
We tend to think of specificity as selector precedence and source order.
The type of selector (e.g., an ID, class, element, etc.), and the number of selectors used, determine how much priority that style has. If there is a tie, styles that come later in the code take precedence over ones that came earlier.
Given this button markup:
<button id="submit" class="my-button my-button--primary">Submit</button>The following CSS scenarios will apply style priority as indicated in the comments.
.my-button.my-button--primary { /* … */ } /* this style applies */
.my-button { /* … */ } /* this style is overridden */
/* or… */
#submit { /* … */ } /* this style applies */
.my-button { /* … */ } /* this style is overridden */
/* or… */
.my-button { /* … */ } /* this style is overridden */
.my-button { /* … */ } /* this style applies */
If there's an inline style on an element, that will take priority over styles in your stylesheet.
<button style="color: red" id="submit" class="my-button my-button--primary">Submit</button>
#submit { color: blue } /* the color will be red */
There are also Shadow DOM styles, author styles, and browser styles. Each of these has its own place in style priority. Yet, the specifics of each are beyond the scope of this article. See Miriam Suzanne's excellent write-up for more on this.
Now here's the important bit.
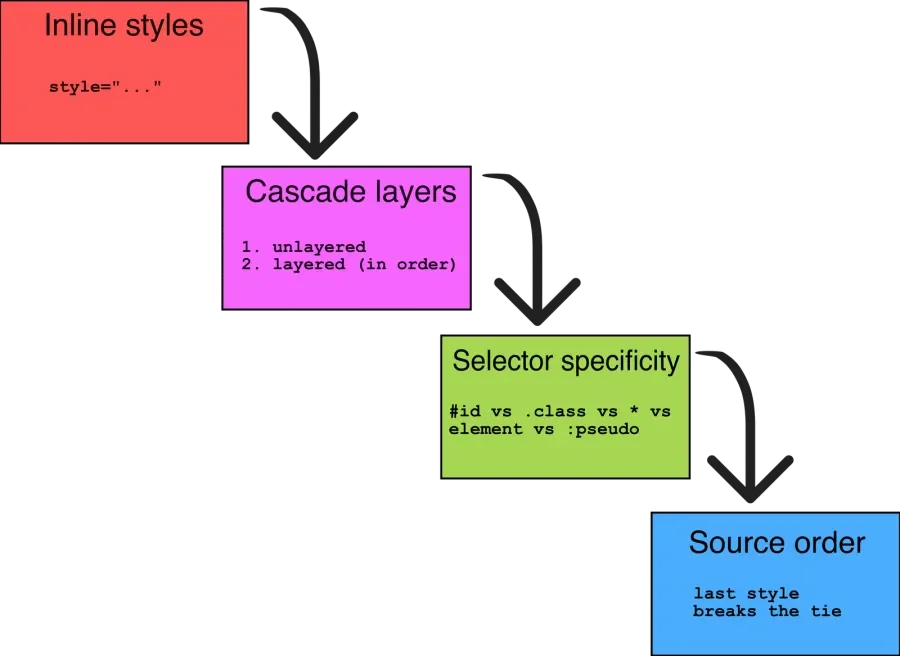
Think of each priority type as its own "bucket." A priority type could be selector specificity, inline styles, or source order. Resolving specificity involves consulting each bucket before moving on to the next.
The selector specificity bucket comes before the source order bucket. The source order bucket is only checked if the selector specificity bucket cannot determine the style's priority.
These buckets start to tell the story of how some styles can override others, all else being equal.
What does all this have to do with cascade layers? Cascade layers are their own style priority bucket. It sits below inline styles and above selector specificity and source order.
Let that sink in. Cascade layers happen before the browser looks at which selector types are used.
The Cascade layer's control is direct, unlike selectors. Selecting an ID has more specificity than selecting a class, but there is no way to select an element by class and give it more specificity than an ID. No way, that is, until now. Cascade layers give us that control.
Cascade layers code
Enough theory; let's dig into some code.
The basics
Cascade layers defined with @layer <name>. Multiple names can be defined at once, separated by commas, and each layer has specificity precedence in the order they are defined (in this case, left to right). Multiple @layer definitions are allowed, and their precedence is sorted in the order they are defined.
Layer names can be anything. They work best when they describe the group of styles you are encapsulating.
@layer vendor, base, components, utilities, overrides;It's also a useful pattern to define all the layer names you'll use in your styles at the top of your stylesheet, so there is one place to see and modify the specificity order.
Defining a @layer block assigns the given styles to the named layer.
@layer vendor, base, components, utilities, overrides;

@layer base {
  * + * {
    margin-top: 1.25em;
  }
  body {
    font-size: 1.5rem;
    margin: 0 0.5em;
  }
}
Layers can also be unnamed, but only in the block form.
@layer {
  /* … */
}
Unnamed layers will have specificity in the order they were defined as normal.
Styles outside a layer will always have more priority than styles inside a layer. Styles outside layers also have more specificity than unnamed layers.
Many layer blocks
Each @layer block appends to the layered styles of the same name.
This means that the source order of the layer blocks doesn't matter. Layer blocks are always grouped by layer name. Yet, the order inside the layer block still matters. Inside a layer block, source order still applies. This includes styles appended in a later layer block.
@layer vendor, base, components, utilities, overrides;

@layer base {
  strong {
    font-weight: 900;
  }
}

/* These styles still have priority in the order defined at the top. */
@layer components {
  .my-button {
    padding: 1em;
    border: 2px solid;
    text-align: center;
  }
}

@layer base {
  /* These styles will come after the `strong` styles, inside `base`. */
  em {
    font-weight: 300;
  }
}
Unnamed layers can not be appended.
Layers and imports
Layers can also append from an @import, via the layer(<name>) function.
@import url('some-library.css') layer(libraries);This is useful for wrapping external libraries in the layer of your choice. Notice that the layer name reference must not contain quotes.
Nested layers
Cascade layers sort of provide nesting. Think of them as sub-groups. You can use nested layers for organization, but they are still the same priority as the base layer.
Define nested layers either by placing them inside another layer or with dot syntax.
@layer components {
  @layer atoms {
    button {
      /* … */
    }
  }
}
/* or… */
@layer components.atoms {
  button {
    /* … */
  }
}
Nested layers will appear as their dot syntax versions in browser tools.
Unnamed layers
Layers can also be unnamed (sometimes called "anonymous"). Each is unique, cannot be appended to, and cannot be defined at the top.
@layer {
  /* nothing can append to this layer! */
  .fish {
    background-color: salmon;
  }
}
Source order resolves conflicts between unnamed layer blocks, as normal. Unnamed layers take priority over any named layer. Styles outside a layer still take priority over unnamed layers.
The importance of being !important
Cascade layers should remove the need for using !important as a last resort to winning the specificity war. Instead, !important can be used as it was intended. Yet, understanding its implications inside cascade layers is important (pun unfortunately intended).
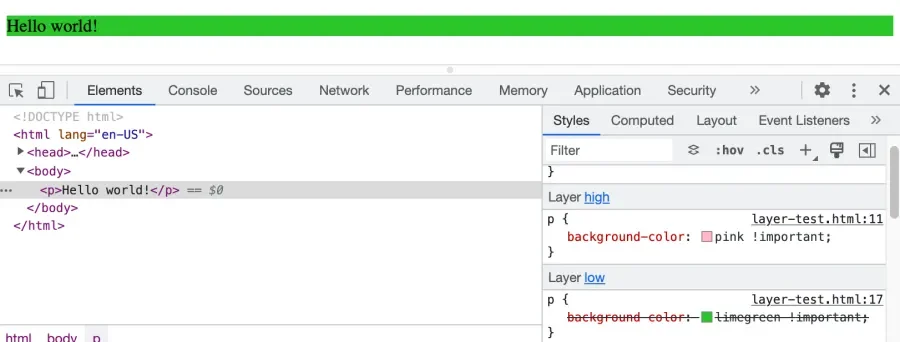
Using !important on a layer style reverses the specificity. Normally, layers have increasing specificity in the order they are defined, with the earliest layer having the least specificity and the latest layer having the most. When using !important, layers have specificity in the opposite direction, with the earliest layer having the most specificity and the latest having the least. In the following example, the button will be limegreen.
@layer low, high;

@layer high {
  button {
    background-color: pink !important;
  }
}

@layer low {
  button {
    background-color: limegreen !important;
  }
}
This principle applies to the entire cascade. You can read about this in-depth in Miriam Suzanne's article.
A quick note on browser tools. At the time of this writing, the style behavior is correct in all supporting browsers. Yet, the dev tools show the wrong, higher layer taking priority.
Conclusion
We hope you have enjoyed this cascade layers exploration. Spread the word that we can lay down arms; the specificity wars are over!


